
Wednesday, February 27, 2008
Monday, February 25, 2008
It's Awesome, Isn't it?
 Alex made this 2.5 quart pitcher and it is awesome! The body was wheel thrown and then pressed into an oval shape. The spout was a thrown cylinder that was carved and attached to the body. The handle was made from slabs as was the bottom of the pitcher.
I had very little input in this process, so you can see he really is my better half. We both sketched handles, but I can't remember whose he chose and Alex hates choosing glazes so that was my job. The color is good, but this pitcher is all about form. The only bad thing about this pitcher is it is so big that shipping costs will be outrageous!
Saturday, February 23, 2008
Getting Organized
I operate pretty well in a cluttered, disorganized space for a while. Then, all of a sudden, I have an overwhelming urge to give everything a home. During this studio rebuild, we are moving everything a dozen times it seems. In stead of moving piles, I want to figure out where everything is going to live and then PUT IT THERE!
We spent the morning building this awesome work table. AND, we earned loads of good karma for upcycling! The table top is an old piece of formica counter top that was used on a kitchen island so both sides are rounded. We covered it in canvas which took Forever. Eternity. Tedious. But it is perfect! The canvas will keep the clay from sticking and the formica won't suck moisture out of the clay - it is a perfect marriage! A lot of the wood was actually 2x4 studs from a wall we took out in the studio. The shelf is made from the door that was in the wall we knocked down.

Once the table was complete, I painted for a while... or until I ran out of paint. Then I made my way to the glaze ingredients shelves. There are a lot of dangerous chemicals on these shelves and the plastic bags are hard to see. They fall over and off the shelves and when I am mixing glazes they are a pain in the rump to get in and out of. I decided to transfer my materials to airtight plastic storage and labeled everything with my P-touch. It is so much easier to see what I have and I feel like it is so much more secure. I discovered during this process that I had double bought several chemicals because I couldn't find anything before.
BEFORE

AFTER
Finally, I'll show something that is almost embarrassing. As I said before, I am happy in clutter a long time, but when I decide to get organized, I tend to go a little overboard... hence the P-touch labeler. On all of my glaze buckets, I have a huge label. I type up the formula in Word and create a table. The first two columns are the glaze formula. The next column is what is takes to make 5 gallons, then 1/2 a bucket, and finally a test batch. This label goes on test batches of glaze, full buckets, and anything else glaze lands in. I know it is a little bit crazy, but I always know where my glaze formulas are!

We spent the morning building this awesome work table. AND, we earned loads of good karma for upcycling! The table top is an old piece of formica counter top that was used on a kitchen island so both sides are rounded. We covered it in canvas which took Forever. Eternity. Tedious. But it is perfect! The canvas will keep the clay from sticking and the formica won't suck moisture out of the clay - it is a perfect marriage! A lot of the wood was actually 2x4 studs from a wall we took out in the studio. The shelf is made from the door that was in the wall we knocked down.

Once the table was complete, I painted for a while... or until I ran out of paint. Then I made my way to the glaze ingredients shelves. There are a lot of dangerous chemicals on these shelves and the plastic bags are hard to see. They fall over and off the shelves and when I am mixing glazes they are a pain in the rump to get in and out of. I decided to transfer my materials to airtight plastic storage and labeled everything with my P-touch. It is so much easier to see what I have and I feel like it is so much more secure. I discovered during this process that I had double bought several chemicals because I couldn't find anything before.
BEFORE

AFTER

Finally, I'll show something that is almost embarrassing. As I said before, I am happy in clutter a long time, but when I decide to get organized, I tend to go a little overboard... hence the P-touch labeler. On all of my glaze buckets, I have a huge label. I type up the formula in Word and create a table. The first two columns are the glaze formula. The next column is what is takes to make 5 gallons, then 1/2 a bucket, and finally a test batch. This label goes on test batches of glaze, full buckets, and anything else glaze lands in. I know it is a little bit crazy, but I always know where my glaze formulas are!

Thursday, February 21, 2008
Studio Changes
Since the sale of our studio and retail shop, we have been tirelessly working to build our studio at home. We decided the guts of the studio will be in our basement while our potter's wheels will be on our sun porch through three seasons and in one end of our kitchen in the winter.

Alex was lucky enough to come across an incredible sink and counter top that was bound for the trash, so that amazing part of the project was free! We built a rustic cabinet for it and it is awesome! Under the sink is our amazing sink trap. We will do a thorough post on that since so many potter's might find instructions and photos helpful.

I have a glaze mixing work bench that I love even though it is very low tech. It is made from big plastic modular shelving and a piece of finished plywood lays across the top. I am still organizing my glaze materials, so my chemical shelves look a little haphazard.


We still have loads of work to do. This weekend the electrician comes to overhaul our wiring and next week the new kiln should arrive! We are still painting wall and hanging lights, installing shelving and more. I know it doesn't look like much, but we are so excited!
Wednesday, February 13, 2008
Creating an Etsy Banner in Photoshop
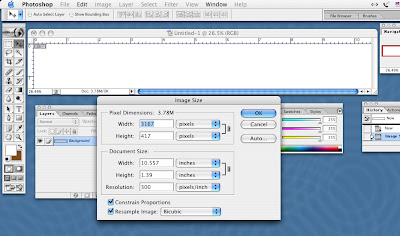
An Etsy banner is always 760 pixels wide and 100 pixels high, so the first step is to create a new Image in Photoshop with the dimensions as 760x100 pixels in 72dpi. Next, under the image menu, choose "Image Size" and change the dpi to 300. Now your image is 3167x417. Why did we do that? Well, 300dpi will keep out banner sharp while we are making it and we didn't have to do any math. When we save the final version it will be 760x100 and 72dpi.
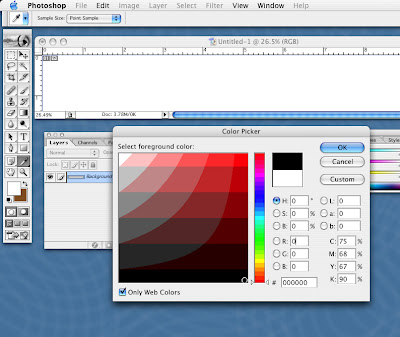
The next step is to decide on a background color. I am going to choose black. I click the foreground color box and then select the color from the color picker. I have selected web only colors. I can change that later if I want to alter a color slightly. I then go under the Edit menu and choose "Fill" and fill with the foreground color.
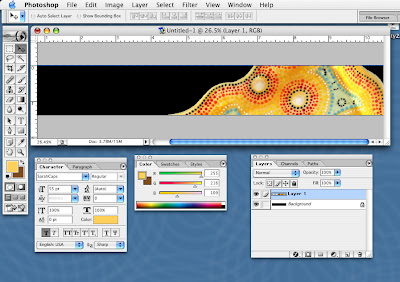
Now it is time to paste in my images. First, I need to be sure to put them in 300dpi as well. I then change the image size to get them in scale with the banner. For instance, the photo of the platter I chose to use was 18 inches high. Since I only wanted the rim, I cropped the photo and reduced it to only 4 inches high. Finally, I just selected the photo, and chose copy under the Edit menu, and then pasted into my banner. In Photoshop, the photo and background are now in separate layers and independently manipulatable. I want this platter to sit off kilter, so I rotate it using the Transform option under the Edit menu.
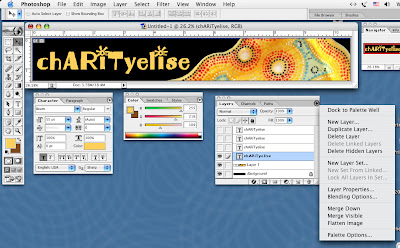
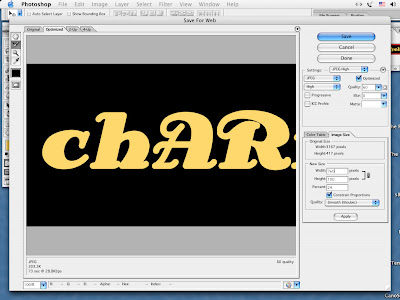
Now it is time for text. Choose the text tool and click on the banner where you want your cursor to appear. I usually start in the center of my text area. Choosing the font is the most time consuming part for me. Notice the text is in its own layer. This is helpful because I can create multiple layers of text and turn them on and off, allowing me to try out a number of fonts without losing the previous ones. I turn the layers off and on by clicking the eye that is next to the layer. If the eye is beside the layer, that layer is visible. Note: I chose a photo with a black background and made sure is was a true black like the banner background for seamless pasting.


Once I settle on a font and everything is perfect, it is time to flatten the image. Once you flatten the image, the layers are fused and editing becomes horrid so save a working copy before flattening. Click the little triangle icon on your Layers window and choose Flatten Image. This will merge all the layers into your background leaving only one layer. If you have invisible layers, Photoshop will ask if it is okay to discard them; the answer is yes.
Now under the file menu choose Save for Web. In the window that opens, in the Image section, now change your banner to 760x100 pixels. It will save your banner in a jpeg format perfect for the web and to Etsy's size specifications. Ta da! You are ready to upload to Etsy!
 As a final aside, there are a hundred ways to get from point A to point B with Photoshop. This is by no means the only way and certainly not the correct way to make a banner. It is just the way that works for me. Have fun!

The next step is to decide on a background color. I am going to choose black. I click the foreground color box and then select the color from the color picker. I have selected web only colors. I can change that later if I want to alter a color slightly. I then go under the Edit menu and choose "Fill" and fill with the foreground color.

Now it is time to paste in my images. First, I need to be sure to put them in 300dpi as well. I then change the image size to get them in scale with the banner. For instance, the photo of the platter I chose to use was 18 inches high. Since I only wanted the rim, I cropped the photo and reduced it to only 4 inches high. Finally, I just selected the photo, and chose copy under the Edit menu, and then pasted into my banner. In Photoshop, the photo and background are now in separate layers and independently manipulatable. I want this platter to sit off kilter, so I rotate it using the Transform option under the Edit menu.

Now it is time for text. Choose the text tool and click on the banner where you want your cursor to appear. I usually start in the center of my text area. Choosing the font is the most time consuming part for me. Notice the text is in its own layer. This is helpful because I can create multiple layers of text and turn them on and off, allowing me to try out a number of fonts without losing the previous ones. I turn the layers off and on by clicking the eye that is next to the layer. If the eye is beside the layer, that layer is visible. Note: I chose a photo with a black background and made sure is was a true black like the banner background for seamless pasting.


Once I settle on a font and everything is perfect, it is time to flatten the image. Once you flatten the image, the layers are fused and editing becomes horrid so save a working copy before flattening. Click the little triangle icon on your Layers window and choose Flatten Image. This will merge all the layers into your background leaving only one layer. If you have invisible layers, Photoshop will ask if it is okay to discard them; the answer is yes.

Now under the file menu choose Save for Web. In the window that opens, in the Image section, now change your banner to 760x100 pixels. It will save your banner in a jpeg format perfect for the web and to Etsy's size specifications. Ta da! You are ready to upload to Etsy!
 As a final aside, there are a hundred ways to get from point A to point B with Photoshop. This is by no means the only way and certainly not the correct way to make a banner. It is just the way that works for me. Have fun!
Wednesday, February 6, 2008
It just keeps spinning.
The world, that is. Everything is moving so fast and there is no time for anything right now. Not even creating.
Last week we sold our studio and retail space. It was a good thing - I was feeling overwhelmed and getting further from my dreams. Having retail hours made me feel trapped. We have been unable to to shows or travel. We have not been away for a weekend in a long, long time.
So, we decided to sell and it was so much work! But finally, we made it to closing and kissed our kiln goodbye. We went to buy a new kiln and GASP!! It takes 4-6 weeks to arrive! Now we are fixing up our home studio space and waiting.
 In the mean time, we have entered the Etsy Mud Team's Salt Shaker Challenge. As with all EMT challenges, it was pretty open ended and the entries came in the form of salt cellars and salt pigs, stopperless salt shakers, and traditional salt and pepper shaker sets. Our entry is above. It is a stopperless shaker that was thrown on the wheel by me, carved by Alex, and then glazed by me. I love it! Below are all the entries.
To vote, click on the picture to be taken to the voting page. Your vote will automatically enter you in a drawing for free pottery. If you do not have an Etsy user name, just put NONE in the field for Etsy ID. Good luck! To all of us!
Subscribe to:
Posts (Atom)